
The Importance of Regular Oil Changes
As the proud owner of a shiny new (or not-so-new) set of wheels, I’ve come to understand just how crucial regular oil changes are for the longevity and performance of my beloved automobile. Think about it – our cars are essentially these complex, finely-tuned machines that rely on a delicate balance of components working in harmony. And at the heart of it all is the engine oil, silently toiling away to keep everything running smoothly.
Now, I know what you might be thinking – “Oil changes? Pffft, that’s just another ploy by greedy mechanics to bleed me dry!” But let me assure you, my friend, regular oil changes are anything but a scam. In fact, they’re one of the most important (and cost-effective) maintenance tasks you can undertake to ensure your car keeps chugging along for years to come.
You see, over time, that trusty oil in your engine breaks down and becomes contaminated with all sorts of nasty gunk – things like dirt, debris, and even metal shavings from the engine’s internal components. And as that oil degrades, it becomes less effective at lubricating and protecting those delicate moving parts, which can lead to accelerated wear and tear, and even catastrophic engine failure down the line.
So, why not take matters into your own hands and learn how to change your own oil? It’s actually a pretty straightforward process, and with a little bit of know-how and the right tools, you can save yourself a bundle of cash while ensuring your ride is running at its absolute best. Trust me, your mechanic will be scratching their head when they see how well-maintained your engine is!
Gathering the Necessary Supplies
Alright, let’s get down to business. The first step in this whole oil-changing endeavor is to make sure you’ve got all the necessary supplies on hand. And don’t worry, you don’t need to be a certified mechanic or have a fully-stocked garage to get the job done.
At a minimum, you’ll need:
– The correct type and quantity of engine oil for your vehicle (check your owner’s manual for the specifics)
– A new oil filter
– An oil drain pan (to catch all that used oil when you drain it)
– A socket wrench and/or oil filter wrench (to loosen the oil filter)
– Gloves (to keep your hands clean and protected)
– Some rags or paper towels (for cleaning up any spills)
Now, I know what you’re thinking – “Wait, where do I even find all this stuff?” Well, my friend, that’s where National Site Supplies comes in. They’ve got a fantastic selection of high-quality automotive parts and tools, all at prices that won’t make your wallet scream in agony. Plus, their super-fast shipping means you can have everything you need delivered right to your doorstep in no time.
Preparing Your Vehicle
Alright, now that you’ve got all your supplies ready to go, it’s time to prepare your vehicle for the oil change. First and foremost, make sure your car is parked on a level surface and the engine is completely cool. Trying to change the oil on a hot engine is a recipe for disaster (and potentially some nasty burns).
Next, locate the oil drain plug – it’s usually located on the bottom of the oil pan, and it’s typically a large, hexagonal bolt. Using your socket wrench, go ahead and loosen that bad boy, but don’t remove it just yet.
While you’ve got the wrench handy, it’s also a good idea to locate the oil filter. This is usually accessible from the top or side of the engine, and it’s often shaped like a canister or cylinder. Make a mental note of where it’s positioned, as you’ll need to remove it later in the process.
Now, slide that oil drain pan underneath the drain plug, and you’re ready to start the big oil change!
Draining the Used Oil
Alright, here comes the fun part! With your oil drain pan in position, go ahead and remove the drain plug by turning it counterclockwise. Watch as that stream of used oil starts to flow out, filling up your trusty drain pan.
Now, I know what you might be thinking – “Ugh, that looks like sludgy, black goop! How could my engine possibly run on that?” But trust me, that’s all part of the process. As I mentioned earlier, over time, that oil gets contaminated with all sorts of nasty stuff, and it’s your job to get rid of it.
As the oil continues to drain, take a moment to peek under the car and make sure there aren’t any leaks or other issues that might need attention. And while you’re at it, go ahead and wipe down the drain plug threads with a clean rag to prepare for reinstallation.
Once the flow of oil has slowed to a trickle, it’s time to replace that drain plug. Carefully thread it back in, turning it clockwise until it’s nice and snug. But don’t go overboard – you don’t want to strip the threads or damage the oil pan.
Replacing the Oil Filter
With the old oil drained, it’s time to tackle the oil filter. This is where that oil filter wrench (or your trusty socket wrench) comes in handy. Carefully place the wrench over the filter, and start turning it counterclockwise to loosen it.
Now, I’ll warn you – that filter might be on there pretty tight, so you might need to put a little elbow grease into it. But don’t force it, or you might end up with a busted filter and a whole lot of mess on your hands.
Once you’ve got the filter loosened, go ahead and finish unscrewing it by hand. As you remove it, be prepared for a bit of dripping, so have those rags or paper towels ready to catch any spills.
Before you install the new filter, take a moment to lubricate the gasket with a bit of fresh oil. This will help ensure a nice, tight seal when you screw it back on. Then, simply thread the new filter on by hand, turning it clockwise until it’s snug.
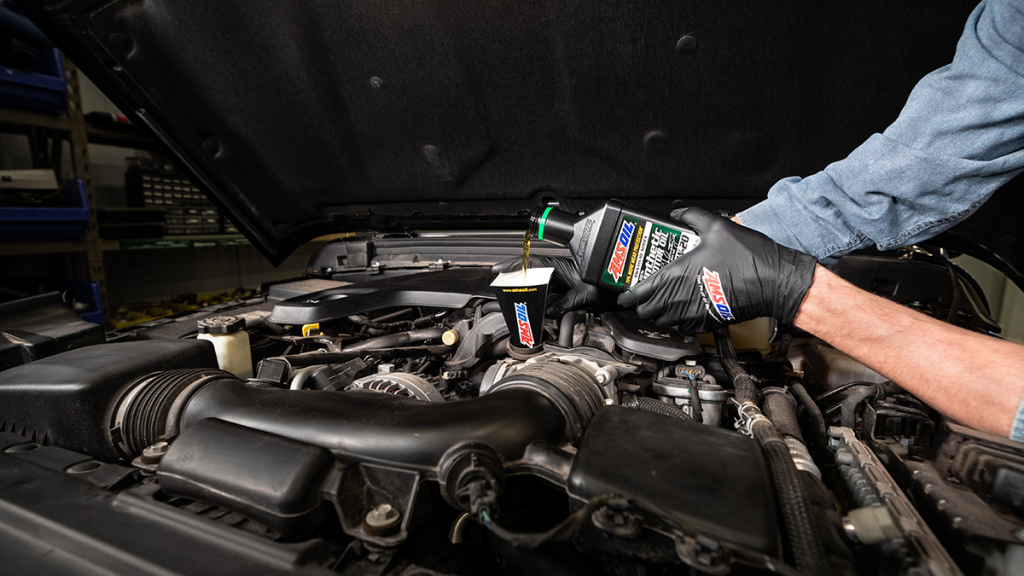
Refilling with Fresh Oil
Alright, we’re almost there! With the old oil drained and the new filter in place, it’s time to refill your engine with fresh, clean oil. Grab that bottle of oil you picked up earlier and start pouring it in slowly, keeping an eye on the dipstick to make sure you don’t overfill.
Now, I know it might be tempting to just dump the whole bottle in and be done with it, but trust me, that’s a surefire way to create a big ol’ mess. Take your time, pour slowly, and check the dipstick frequently to ensure you’re hitting that perfect level.
Once you’ve added the recommended amount of oil (again, check your owner’s manual for the specifics), go ahead and replace the oil cap and dipstick, making sure they’re securely in place.
Finishing Touches
Alright, the hard part is done! Now it’s time for the finishing touches. Start by giving your work area a quick clean-up, making sure to dispose of the used oil and filter properly. Most auto parts stores or recycling centers will gladly take that stuff off your hands.
Next, go ahead and start up your engine and let it run for a minute or two. This will help circulate the fresh oil throughout the system and ensure everything is lubricated and ready to go.
Once the engine has had a chance to run, go ahead and recheck the oil level on the dipstick. You may need to add a bit more oil to bring it up to the full mark, but be sure not to overfill.
And there you have it, folks! You’ve just successfully changed your own oil, saving yourself a bunch of money and ensuring your car is running at its absolute best. Pat yourself on the back, grab a cold beverage, and bask in the glory of your newfound automotive prowess.
Maintaining Your Maintenance Routine
Of course, changing your oil is just one part of the ongoing maintenance equation. To keep your car running like a well-oiled machine (pun intended), you’ll need to stay on top of a whole host of other regular tasks, from tire rotations and brake inspections to coolant flushes and air filter replacements.
But you know what they say – “Rome wasn’t built in a day.” Start with the oil changes, get comfortable with the process, and then gradually expand your DIY maintenance repertoire. Before you know it, you’ll be a regular grease monkey, saving money left and right while keeping your beloved ride in tip-top shape.
And remember, National Site Supplies is always there to help you out with all your automotive needs. Whether you’re in the market for top-notch tools, high-quality parts, or just some expert advice, their team of knowledgeable professionals has got your back. So don’t be afraid to reach out and let them know how they can help you on your journey to becoming a car care champ!
Happy wrenching, my friends!